

See that? That is a quilt that I made as a sample for my LQS's new Kona club that starts next Tuesday. (They don't even know it yet.....unless, of course someone from the shop is reading this.) My inspiration came from the paintings of Georgia Gray. She uses bold solids and I love them! I am going to show you how to make your own.
First, you do a drawing! Just like with most of my stuff, I make the drawing to scale, and when I like it, I bold it out with a Sharpie. (That's so I can see it when I put it under the base fabric.)

You will see that although it appears as though dark blue was my base fabric, it was not. I decided that white had to be the base so I could retain the cool, crisp whiteness of the circles. (Besides, I can see my pattern through white......you'll see that later.) Note that I numbered all the blue spaces and that was so that I could fuse a big hunk of blue and cut the pieces out all at one time, numbering them on the back so that I could place them all at one time. Cut your base white fabric at least 1/2 inch bigger all the way around just in case the quilt is not even when you get done.
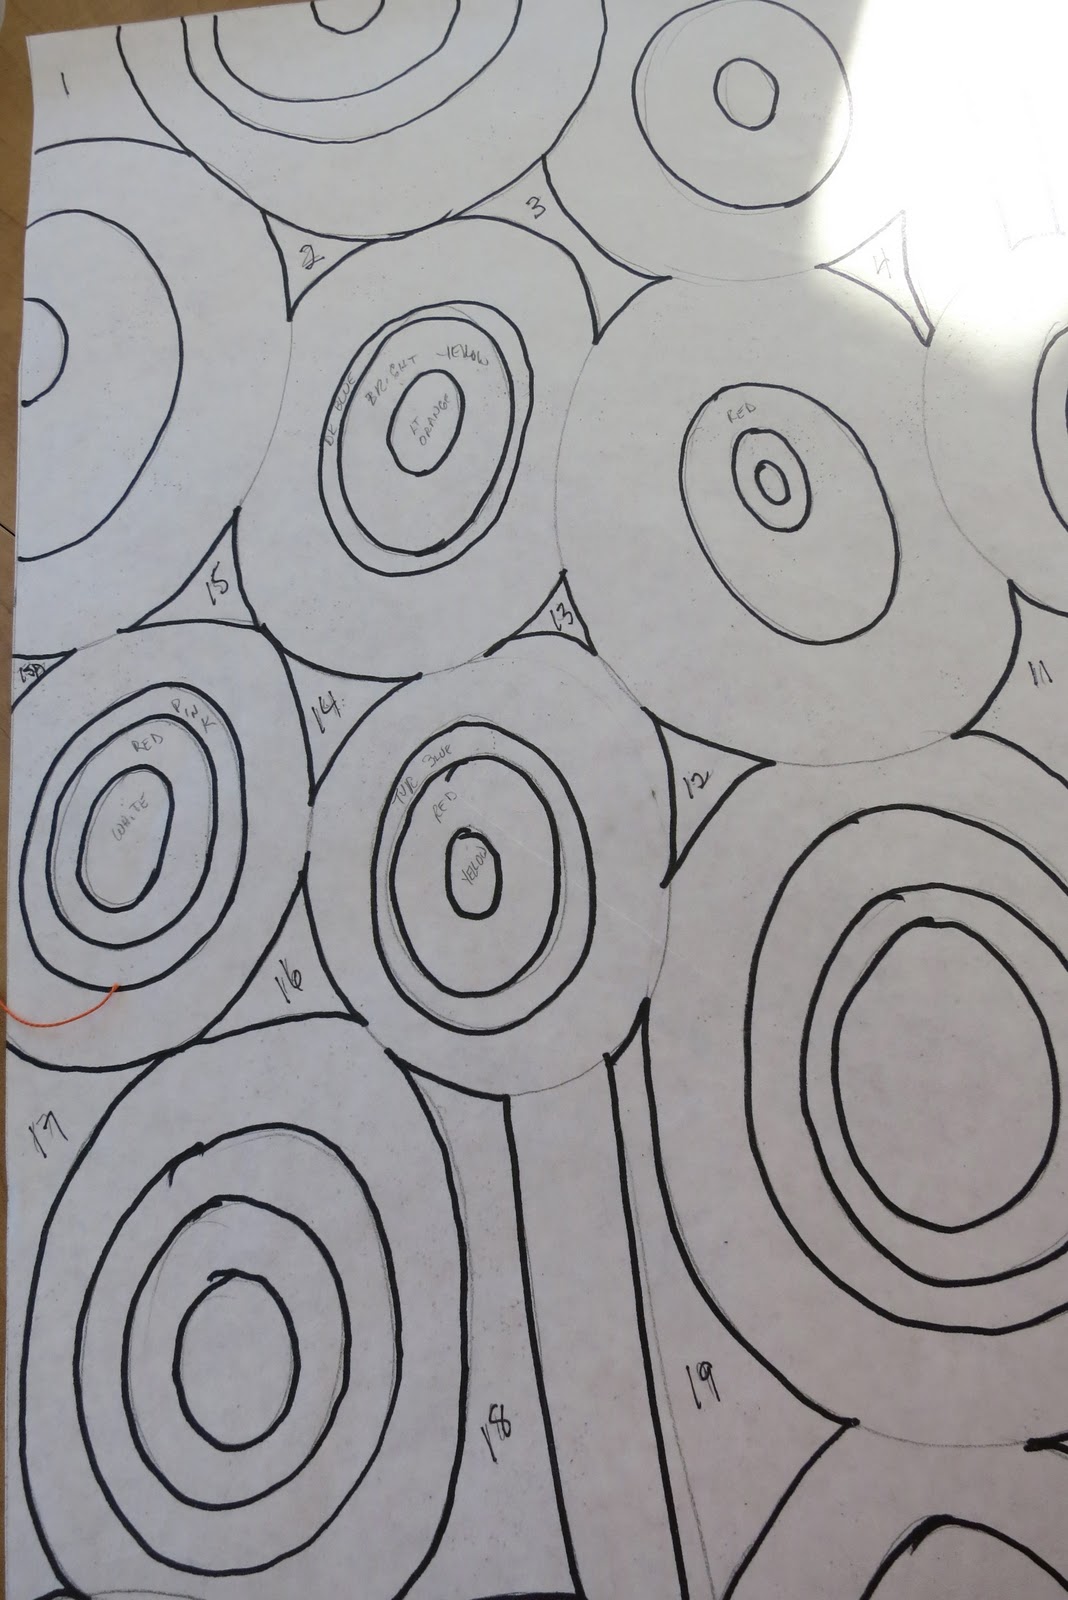
See the numbers? I use Steam a Seam and that's so that I have a clean sheet to use as a pattern with one sheet still on the back of the blue fabric. I trace the front of the blue numbered spaces on that clean sheet, place it over the paper pattern, and cut the blue fused fabric from the "front" or top. NUMBER your pieces on the paper back as you go so you know what is what! (I get too confused turning it over and tracing them on the back. Besides, for me, this is much faster!) When you're done, you should have pile of blue pieces ready to fuse.

You'll note that as I was doing that, I put the pattern underneath so I could see what I was doing. You should only do a section at a time and then iron them down. (Sometimes the fusing doesn't stick like it should as a temporary agent and when you get up with your piece to take to your iron, they fall off and then you have a real mess!) DO NOT IRON THE PAPER PATTERN...only the fabric!
When you get all those dark blue pieces ironed down, it's time to start on the colored circles and I really can't tell you how to do that. It's a matter of color preference. I like red, so used the majority of reds and oranges. The trick is to ALWAYS repeat a color somewhere else. The eye flows better that way. (Unless it's in the same color family, and lighter. Sometimes you can get away then only using one of that color. I think I used a pale yellow for one of them.)

So here it is all fused and ready to be quilted. At this stage, I must admit, I let it sit for a few weeks. I really didn't know how I was going to quilt it until I looked at Georgia Gray's paintings again.

Of course, you already know what I did. I sewed down each circle with the appropriate color thread and then just used white to go round and round each white section. Here's a close up of the finished quilt.
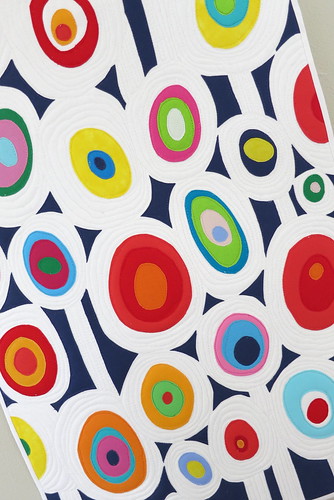
It's hard to see the white quilting, I know. I love it! It's already hanging in my dining room and I think it will have a permanent home there. At 19x28 inches, it seems to be the perfect size. Besides, it makes me smile and isn't that what it's all about????
Love, love, love it!
ReplyDeleteIncredible! It's absolutely gorgeous!
ReplyDeleteThanks Carol, for explaining your process! Yes, it's definitely all about making us smile inside! You always amaze me!
ReplyDeleteThanks Carol for the 'how to' post. All your work makes me smile!
ReplyDeleteYou need some Fiestaware to go with it!
ReplyDeleteThis is so wonderful and thank you for sharing how you made it. I went to look at her paintings and surely she is or should also be a quilter.
ReplyDeleteThat art/quilt is truly wonderful. If you ever make one that doesn't suit you, you have my address and it would look perfect in my home- I promise to take very good care of it and it would make me smile every day!!! Magical and enchanting and definitely from the heart! Love it!!! Keep making more!
ReplyDeleteAnother amazing art quilt! I live for the day I can try out all the ideas I have. In the meantime, I'll live vicariously through you. :)
ReplyDeleteThat's a fun piece, Carol. I think I need a photo for every step of the way cause I got lost immediately. Good idea to applique the dark background pieces onto the white!
ReplyDeleteI LOVE IT!! Thanks so much for stepping us through your process. I can't wait to try your "front side" technique for cutting out your pieces - that sounds soooooo much easier. You are a wonderful inspiration - I get so excited when I see you have a new post! Thank you , thank you, thank you! Deborah
ReplyDeleteLOVE this! Thanks for sharing!
ReplyDeleteamazing, I have resisted the fuse technique because honestly quite a lot of what I've seen made that way I didn't really care for. You've opened my eyes and many doors for me with your wonderful creation.
ReplyDeleteVery cool tutorial!
ReplyDeleteThanks for the clear instructions.
Hugs from Mary
Thank you for sharing your process with us.
ReplyDeleteBeautiful new quiltie! Thanks for the tutorial.
ReplyDeleteI love the quilt and great tutorial.
ReplyDeleteSo cool Carol! Thanks for sharing your process!
ReplyDeleteThis is so amazing! Your quilt makes me smile and your class participants will be so happy to be in your class! It is stunning!
ReplyDeleteWhat a great quilt you made and thanks for explaining how you did it!
ReplyDeleteIt makes us happy, too. Thanks for sharing the "how to".
ReplyDeleteHugs!
Smiled when I saw it...love it!!! TFS
ReplyDelete~Terry~
Hi, I really loved the interpretation of the painting you did Mrs. Gray. I visited the website of Georgia and has a nice art.
ReplyDeleteYasmin
Carol!! That's so much fun to look at. I love your method and I think the students in your class will, too. Gorgeous results with all of those brilliant solids!
ReplyDeleteAmazing, awesome. Great colors. Thanks for sharing your process. I'm a new follower! Found you via pinterest.
ReplyDeletethis is absolutely gorgeous! i have admired georgia gray's paintings for awhile thanks to pinterest. you have done a beautiful interpretation and thanks for the wonderful tutorial!! your colors are lovely. i'll have to go get some kona solids.
ReplyDeleteAwesome! Awesome! Awesome Carol!
ReplyDeleteCarol - not only are yu so awsomely artistic - youa re very generous too. Thanks heaps.
ReplyDelete...that is absolutely what it's all about - to enjoy and this art textile makes me feel soooo good!!!First I thought it is a printed fabric. You are a really unique fabric artist and I love your works! I hope I will have time to make similar for my wall and I will ask your permission to use your idea!
ReplyDeleteThanks again for inspiration!
x Teje
Just toooo beautiful!!!! Love it!
ReplyDeleteHow do you sleep at night with all these absolutely fabulous, colorful ideas going around in your head? This has got to be my favorite of all times. Thank you for the how to. You make it look like even I can do it! This is so my style.
ReplyDeleteOoooo I LOVE this! And with a bunch of fat quarters it is totally doable! Wish I could transport myself into your class!!
ReplyDeleteA Fabulous tutorial on your process. You are so giving and obviously you don't mind that many of us will attempt to reproduce your work after following your tutorial, except in our own color preference. Your work is always so uplifting. Thanks for continuing to share your expertise with us. Love, Love, Love your artistic quilt creations!!!! "You're the bomb!!!!"
ReplyDeleteluv from Texas.
Nice :-)
ReplyDeleteohhh yes makes me smile too...like big polka dots lol
ReplyDeleteIt makes me smile also. Thank you for the tutorial. I would like to try something like this.
ReplyDeleteAwesome!! I totally love it! Thanks for the how-to info.
ReplyDeleteJust unbelievable!!!
ReplyDeleteColoures, quilting, all.
I'm impressed.
regards Ingrid
I love this circle-ish quilt! It reminds me of mid-century Marimekko fabrics! Thanks for the great tutorial!
ReplyDeleteThat's stunning - thank you so much for sharing the tutorial - I am going to add it (or one inspire by it) to my to do list!
ReplyDeleteThis is so amazing I had to come over from Flickr and check it out. Truly, one of the coolest things I've seen. Thanks for sharing!
ReplyDeleteWow, this just takes my breath away. I love your quilt, and, love the fact that you would share your design and talent with us. Just found your blog via Pinterest, but, I'm sure it won't be the last.
ReplyDeleteAre you the one who draws the ladies...I would love to have a pattern to look like me....They are soooooo cute. How much do you charge to do from a picture....I just love these.........Please let me know.......TwoHorseQuilter@aol.com
ReplyDeleteLove all your quilts....but love the ladies.....
Great quilt, thanks for the tutorial, I must give it a try!!
ReplyDeleteThis is the coolest thing I have ever seen. Simply stunning.
ReplyDeleteThis is an amazing quilt! I would love to know if you used white on the back? And I was wondering if would be okay if I use this as inspiration to make a lap quilt for a school auction.
ReplyDeletecj.infanger@gmail.com
congrats. very dynamic, beautiful quilt.
ReplyDeletefantastic!
ReplyDeleteI just started a collaborative art project at my school that is inspired by this!
http://zamoranoarts.blogspot.com/2012/09/and-off-we-go.html
Thanks for the inspiration:)
This is beautiful. :)
ReplyDeleteThanks so much. Your quilt is beautiful. My daughter loves it and has asked me to make her a twin size. Do you think that would be too hard? I am intermediate to advanced quilter.
ReplyDeleteThanks so much. What a beautiful quilt. Do you think making a twin sized would be too difficult?
ReplyDeleteBeautiful, thank you for the inspiration and such a good tutorial.
ReplyDeleteThis is the most gorgeous quilt I've ever seen, love it so much
ReplyDelete