
Sometimes it's surprising where we get our inspiration. For me it can come from anywhere, but this time, I saw a greeting card that was especially appealing and so I copied it. I've done this before from napkins, wrapping paper, or even designs on buildings. I named my quilt, "Flowers by Mail" and you'll see why in a little while. Since I made it, I was informed by a Flickr friend, that the image was really from a stamp from the Stampin Up company called, "Send a Celebration". Here is my rendition done on paper the same size as my quilt will be:
 After I drew the image, I traced it onto my fabric lightly, with pencil.
 Since the greeting card was done in watercolors, I really wanted to duplicate that look, and remembered that I had recently read of a method of coloring with crayons on fabric and setting the wax with an iron to obtain a watery look. First though, I knew I had to iron a piece of freezer paper to the back of my fabric for stability so the material didn't bunch as I was coloring.

After I was done coloring and I did make my middles a bit darker for shadowing, and even used a light gray on the envelope, I removed the freezer paper, and got a piece of white muslin to put over the quilt top so that I didn't get wax all over my iron when I was setting the colors. There was a bit of a trick to that since I remembered reading that you needed to smell the wax to know when it was done. Don't iron it too much or you will scorch it.
After that, I wanted the flowers and envelope to stand out a bit from my background quilting so I decided to use trapunto. (Another new technique for me.) I cut a piece of 100% thin cotton batting bigger than my image and put the quilt top on top of it, then pinned it around the image with flat head long pins. Then, in order not to catch any unnecessary extra batting in my initial stitching, I turned it over and cut on the outside of my pins so that everything would be smooth.
 Then, I used white thread in the top and bobbin and free motion stitched around each flower, heart and envelope.
 And when was done with that, I turned it over and cut as close as possible around all the stitching. Note the child's scissors with blunt tip just for safety. I sure didn't want to cut into my top fabric at this stage.
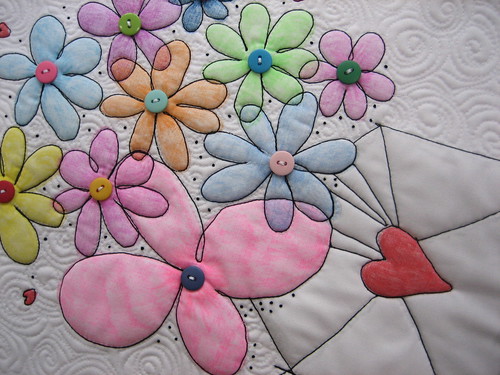
 Then, I sandwiched as usual, using my favorite 505 spray adhesive. I have no picture of that, I'm afraid. Next, I wanted to stitch around each flower, heart and envelope with black, so again I did something I've never done.......I used #12 DMC perle cotton. I knew that the thickness would be perfect to make my flowers pop. Only there was one problem.......first I had to thread a bobbin with the perle cotton since I have no big thread holder. It worked perfectly! I used a fine black thread in the bobbin (on the bottom). I left all my threads hanging as I was sewing each flower, and was careful not to get them in a different flower's stitching because they were thicker than I had thought. And when I was done stitching, I buried them by bringing them to the rear and burying them in the batting.
 Then, I used white thread in the top and bobbin and free motion stitched around each flower, heart and envelope.
 And when was done with that, I turned it over and cut as close as possible around all the stitching. Note the child's scissors with blunt tip just for safety. I sure didn't want to cut into my top fabric at this stage.
 Then, I sandwiched as usual, using my favorite 505 spray adhesive. I have no picture of that, I'm afraid. Next, I wanted to stitch around each flower, heart and envelope with black, so again I did something I've never done.......I used #12 DMC perle cotton. I knew that the thickness would be perfect to make my flowers pop. Only there was one problem.......first I had to thread a bobbin with the perle cotton since I have no big thread holder. It worked perfectly! I used a fine black thread in the bobbin (on the bottom). I left all my threads hanging as I was sewing each flower, and was careful not to get them in a different flower's stitching because they were thicker than I had thought. And when I was done stitching, I buried them by bringing them to the rear and burying them in the batting.
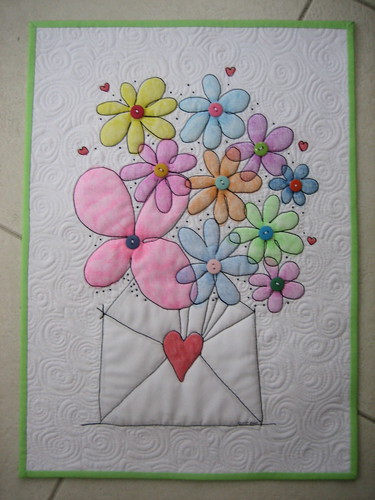
On to the background quilting which I did in my newfound swirls! Oh, so pretty! Then, I trimmed it, bound it with a solid matching green, and put some buttons and colonial knots on for whimsey and wa-la:
I hope this has been helpful. If you have any questions, don't be afraid to ask and I will answer them in the comment section so you all can see.
23 comments:
Thank you for sharing all that information Carol! I was wondering how you worked with the crayon. I would like to try that out on something. We have plenty of crayons around here :)
It looks fabulous. Great step by step instructions. Might get my daughters crayons out and have a go. Thank you :-)
I love seeing your process, it's amazing!
Thanks for sharing this! It is really wonderful. ^_^
Thanks for sharing this Carol, I have bought my crayons so am ready to go. One question, did you have to alter your tension as you were using perle thread? I might just copy your one to start with, I hope that's alright. We should start a 'Inspired by Mamacjt' flickr, but I have no idea how to go about that. Thanks again
Copy away! I did it, why shouldn't you? I don't think the stamp place is in the quilt business and I'm not selling this quilt anyway....not that I would...so I really think that images that you find places are up for grabs. Maybe that's just me!
A hint.....when you use the #12 perle cotton in your machine, go slowly, and use a size 12 or 14 needle. You need the bigger hole to accommodate the wider thread. My machine sounded like it might break, I was getting so many strange sounds as I was sewing, but once I started, I wasn't going to stop unless the machine did. I was that determined! LOL
Wow! This is amazing. I love everything about this quilt. The design, the technique you used, everything.
Thanks for the tutorial.
thanks Carol, I love reading through your whole process! I've used cards I've received for inspiration a few times, and currently have a stack in my sewing room just waiting for me to have a go! I've also done the heat set crayon thing, and will be trying it again, with brighter colours - maybe I'll have to do a "Flowers by Mail" myself. I think as long as you aren't trying to sell something that you've copied from someone elses design, you are okay, especially if you acknowledge where the inspiration came from. I'm with Jo - I was thinking about an inspired by Mamacjt site the other day myself!
Carol, good job on this! I pulled out my colored pencils a few days ago for the project we talked about and I think I want to go back with some crayon on top especially where I used red as it didnt show up as dark as I would have liked. I havent ironed it yet so I will definitely take pictures when I get done...in the next few days.
Soo lovely, Carol! What a great idea using crayons! Haven´t used crayons for more than 30 years (last time in Kindergarten ;o)) maybe I´ll grab son´s crayons to give it a try.
Thanks for the instructions!
Anja
Oh my gosh! I absolutely LOVE it! Thanks so much for sharing the process with us!
I love your quilts! This one is very sweet and you are getting exceedingly good at the swirly quilting!! Inspiring to say the least.
Oh my goodness Carol! That is just delicious! You are so very clever!!!!!
~a
Beautiful, as always, Carol! It looks like a valentine!
i love the watercolor effect that the crayons give. i may need to try this technique. what fun you could have!
holy buckets lady! this is absolutely amazing!! Beautiful!! I'm going to be a faithful follower of yours now that I've found you and I'm coming back again and again to see this absolutely gorgeous (and maybe learn this technique) quilt .... did I say I thought it was beautiful? WOW!!
you are so coll! this is fun and wow...what a great way to do this. How does it hold up in the wash? do you know? I was thinking how fun for grandparents!!! thanks for sharing!
I understand your Trapunto quilting of the flowers and cutting away the batting but I am wondering if you then added batting for the entire piece and did your all over swirl quilting to the background. I'm not clear on the Perle cotton either...did you have to wind it by hand onto something or ???
This is just lovely and something I would like to try.
I really, really appreciate you sharing this. I have a smallish quilt that I've got all ready for the quilting process, I bought my new walking foot, and . . . I've never quilted an actual quilt before, so I was at a loss as to what to do. The ladies in my quilting club were very helpful in getting me to this stage, but I knew what I needed was inspiration. Your swirls are exactly what I need to do in the "sky" portion of my quilt. Thanks so much for the inspiration and the step by step process!
I think my daughters and I are going to give this technique a shot. It looks so fun and pretty and could make some cute Christmas gifts. Thanks for sharing!
I just had to search your blog to find out how you do that fabulous color/trapunto work. I have to give it a try with my granddaughters. Thanks for sharing.
I also did a crayon search to see HOW DID SHE DO THAT! Daughters are both home for Christmas...we must do a coloring project ASAP!! My sewing machine is working better after a little oil thank goodness!!
I had the same question as another commenter...how does it hold up in the wash? This looks amazing!!
Post a Comment